Semi-Automated Indexing | |

Everyone has a book in them, but when you've finished it,
the publisher will email you asking for an Index by yesterday. This will
show you how to index semi-automatically. You can create a Subject index,
a Scripture index (with everything in the right order) and any additional
indexes in Word, without reading your book, and and format it just like
the publisher wants. Quickly.
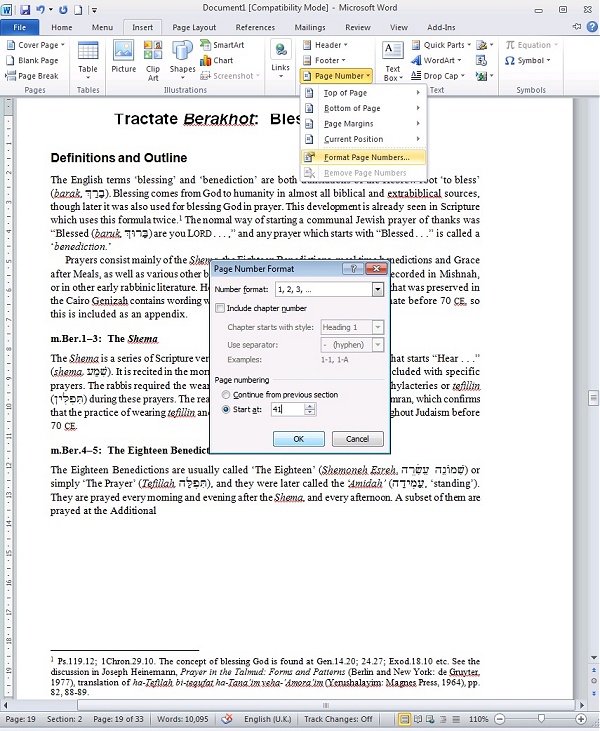
At first glance the instructions look daunting, but that's
only because I'm explaining it in detail.
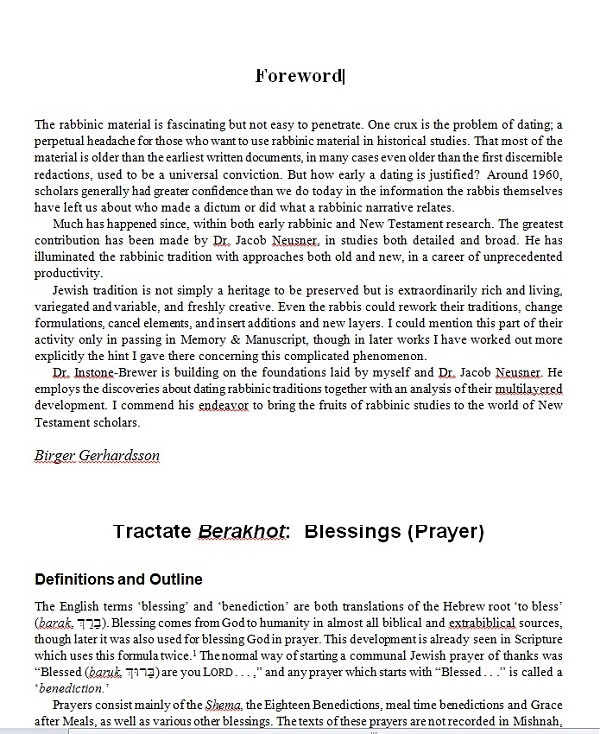
Here is a section from real life for me: part of my
Traditions of the Rabbis in the Era of the New
Testament.
|
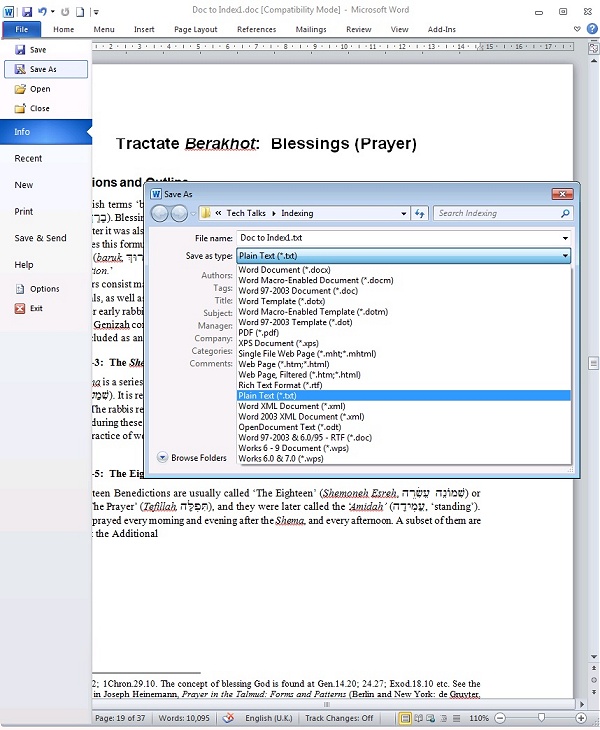
What the publisher sends youMake a Word versionCorrect page numbersSimple Concordance ProgramEdit the Concordance fileRefine the Concordance tableAuto-Index the Word docFormat the IndexSeparate Author & Ref indexesSurplus page numbersReferences markupFine details |
.
|
.
|
.
|
.
|
.
|
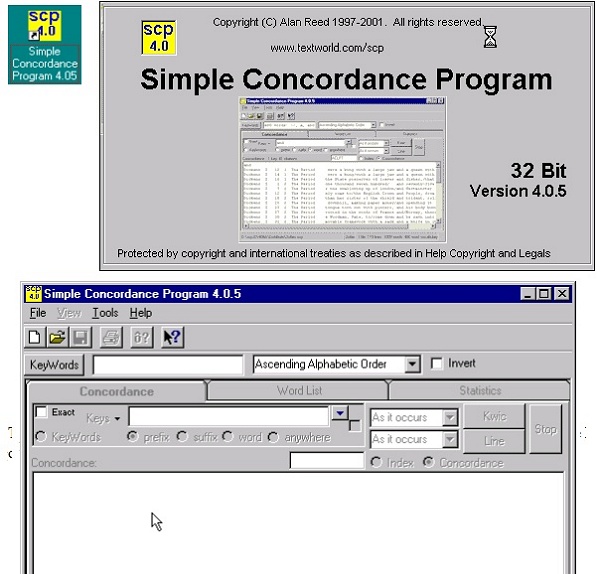
.Make a SCP File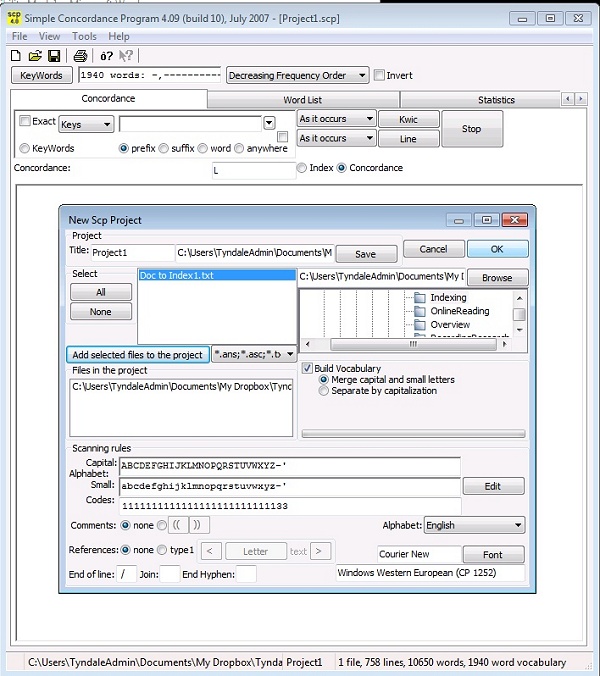
(SCP uses a special format of file, which it can create from a text file) * start up SCP and click on File: New * in the top-right browse for the folder in which you saved your chapters * in the left-hand box, highlight the Plain Text file(s) of your book and click on 'Add selected files' * tick "Build Vocabulary" and select "Separate by capitalization" * click on OK and after much working, it will offer to save the results with a name you choose. |
.Make a Concordance list in SCP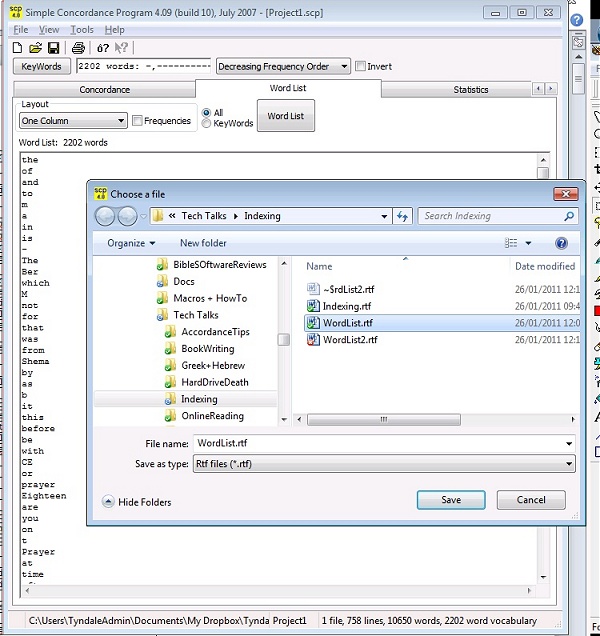
* load the .scp file which you just made by clicking on File: Open * click on the tab 'Word List' * change the order to 'Decreasing Frequency Order' * change the layout to One Column * remove the tick from 'Frequencies' * click on the button "Word List" to produce the list * save it by clicking on File: Save: Save it as WordList.rtf |
.Edit the Concordance File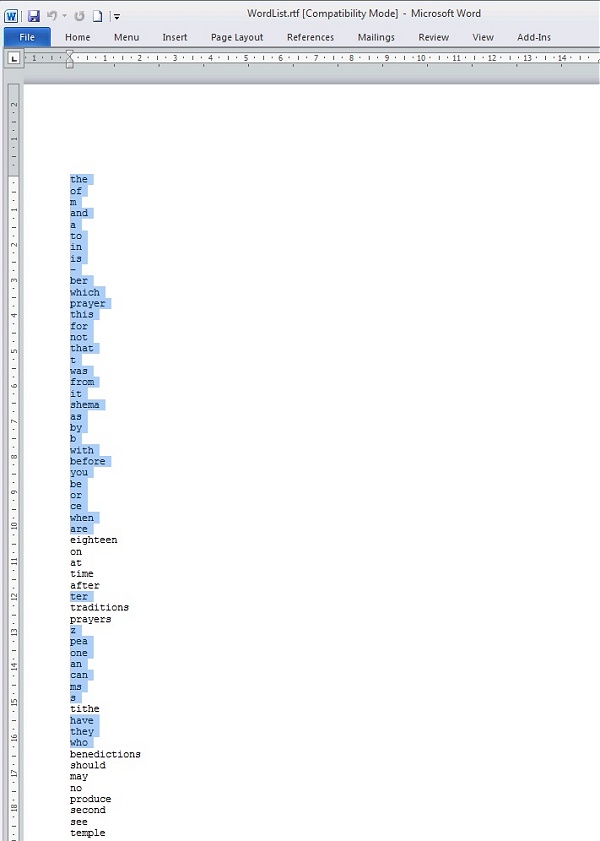
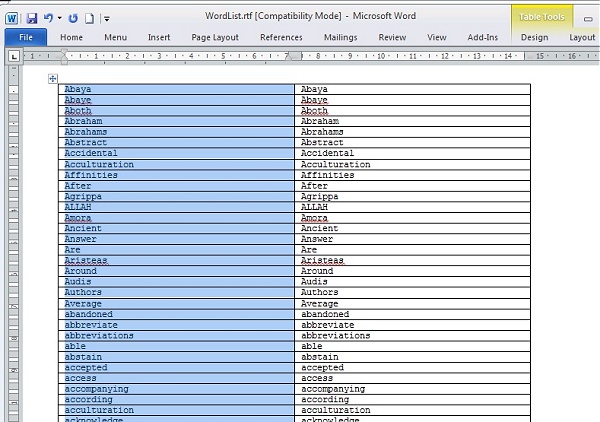
* open the WordList.rtf file in Word, by clicking on File: Open * change 'Types of file' to 'Rich Text Format' * find the file you made (if you can't find it, look in the SCP folder) * remove all the words which you don't want to include (ie most of the words at the top of the list) * if words occur twice, once starting with a capital (as used at the start of a sentence), keep both versions, because Word's index markup is case-sensitive |
. Make a Word Concordance Table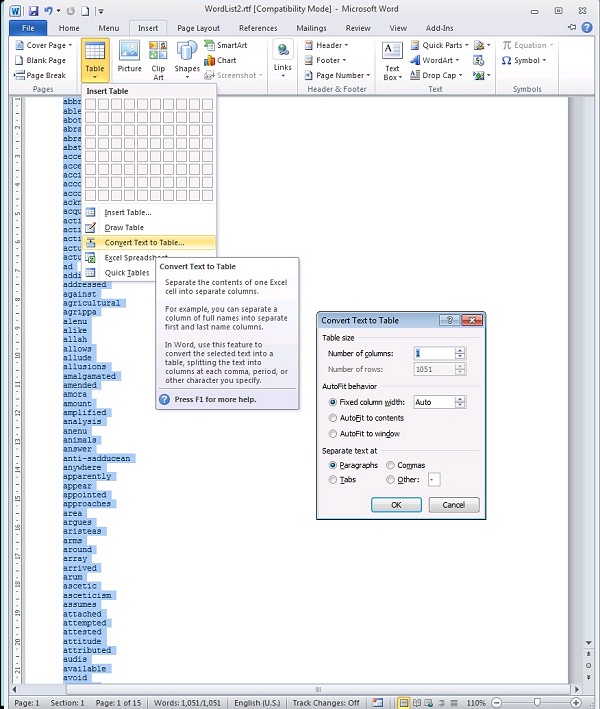
* the Word concordance needs to be a two column table * highlight all the text by pressing Control-a * click on Insert/Table: Convert text to table..' * accept the default (1 column, separated by paragraphs) and click OK * save the file as "Concordance.doc" |
.
|
. Refine Your Word Concordance Table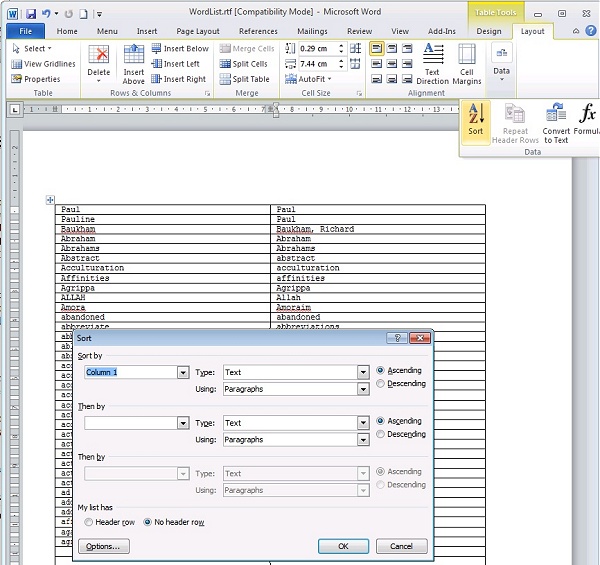
The left hand column is the words as they occur in your
manuscript, and the right-hand column is the entry which will appear in
your index. Most of the time they are identical but you may want to make
some changes, eg:
Sort the table alphabetically to make things easier:* 'Paul', 'Paul's' and 'pauline' might all have the index entry 'Paul' * 'Baukham ' should be Baukham, Richard * click on "Table", "Layout", "Data", "Sort", and accept the defaults of "Column 1" and "Text" "Ascending" * do not remove duplicates such as "Sacrifice" and "sacrifice" because Word needs to know that you want to mark up both an instance occurring at the start of a sentence as well as the one inside the sentence. * save when you've finished (this is the longest job) (If you want more than one index, with Modern Authors separately, see below) |
. Auto-index your Word document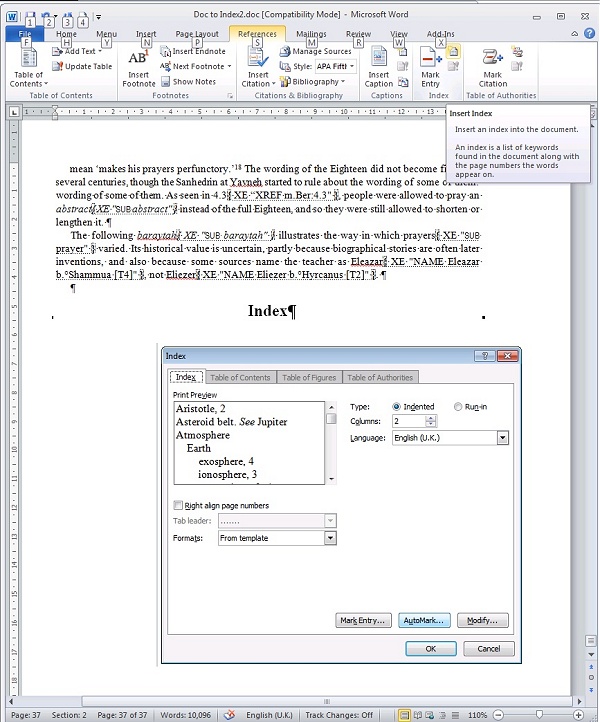
* open the Word document which has the correct page numbers. * make a copy of it (ie one without index marks, so you can start again if necessary) * click on Insert/References: Insert Index (upper right of "Mark Entry") * don't worry about the formatting at present. Just click on "AutoMark" and find your Concordance.doc. * wait while your text is automatically marked up * when it is done, you can see the markup * save the file with a new name (in case you change your mind about the Concordance.doc data) (to hide and unhide the data, click on "Home" and press the backwards "P" symbol) (when the codes are visible, you can Find them with XE "*" ) |
. Generate the Index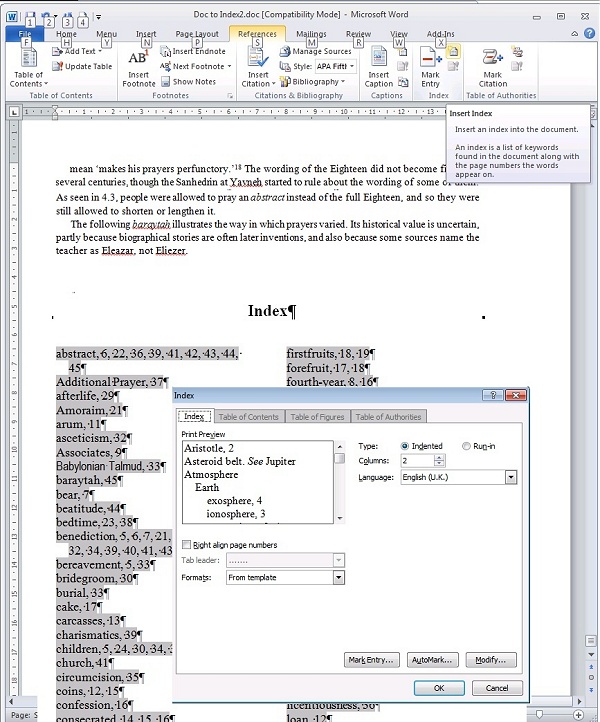
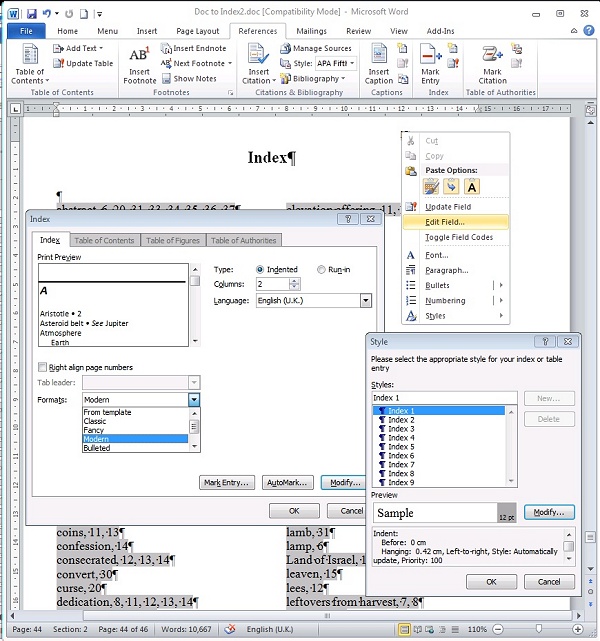
* hide the index coding (see above). The codes may cause page lengths to overrun. * to insert the index, move the cursor to the end (where you want the Index) * click again on Insert/References: Insert Index...: and click on OK |
.
|
.
|
Extra note thanks to Diane H:
It
is possible to remove the Cross Reference full stop as in ‘Christ. See
Jesus’ so it reads ‘Christ See Jesus’. In Word 2010 go to Insert,
Quick Parts (in the Text paragraph), Index, Field Codes (Bottom
left), Options (Bottom left), choose \k “ “ (up to 5 characters).
a.
This
will insert a new index. Make sure that ‘Preserve formatting during updates’ is
checked if you want to use the ‘Update Index’ under the Reference tab.
b.
This
procedure overrides the ‘two column’ setting, which you get somewhat
automatically using the index insertion under reference. So you will also need
to add the switch for two columns, which is \c. To remove
all the cross
reference full stops and get two columns. Make sure not to have a space before
the second switch
\c
“2”\k “ “
c.
The above will
work for the full stops on main entries, as well (remember the macro we had to
write!). Same as above but use the \e switch. Doing this automatically changes
the cross refs as well (I think).
\c “2”\e “
“
Now, if we
could just override the ‘tab’ we could get the pages to align. MSFT has
appropriated the ‘tab’ for ‘right align’. Wouldn’t it have been nice to put the
tab in \e “ “ and have everything nicely automated.
. Macro for removing surplus numbers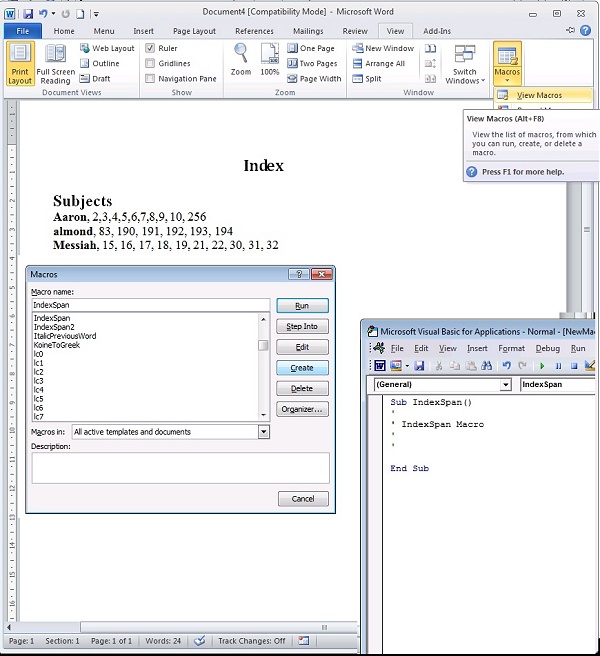
When you Generate the index, you may have runs of numbers
which the Word Index function can't clean up, eg:
Messiah, 15, 16, 17, 18, 19, 21, 22, 30, 31, 32
- you want to turn this into: Messiah, 15-19, 21-22, 30-32
If this isn't a big problem you can do it manually, or you
can use the macro below. To install it:
* click on the menu "Tools" or the ribbon "View", then on "Macros", "View macros" * in "Macro name:" type "IndexSpan" and click on "Create" and the Macro editor opens. (If it doesn't, click on "Edit") * Copy the whole macro (from ========== to ==========) and Paste under "IndexSpan()" * Go back to the Word document, put the cursor ABOVE the index, then click on Macro, highlight "IndexSpan" and "Run" it (If the macro gets stuck, press Ctrl-Break to stop it). |
. Here's the macro to copy and paste: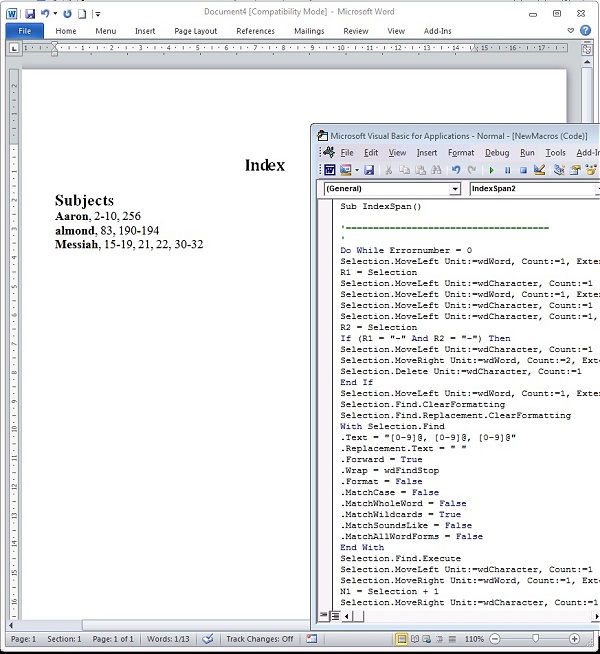
'==================================== Selection.MoveLeft Unit:=wdCharacter, Count:=1 Selection.MoveRight Unit:=wdCharacter, Count:=1 On Error GoTo SubEnd 'remove after debug Do While Errornumber = 0 Selection.MoveLeft Unit:=wdWord, Count:=1, Extend:=wdExtend R1 = Selection Selection.MoveLeft Unit:=wdCharacter, Count:=1 Selection.MoveLeft Unit:=wdWord, Count:=1, Extend:=wdExtend Selection.MoveLeft Unit:=wdCharacter, Count:=1 Selection.MoveLeft Unit:=wdCharacter, Count:=1, Extend:=wdExtend R2 = Selection If (R1 = "-" And R2 = "-") Then Selection.MoveLeft Unit:=wdCharacter, Count:=1 Selection.MoveRight Unit:=wdWord, Count:=2, Extend:=wdExtend Selection.Delete Unit:=wdCharacter, Count:=1 End If Selection.MoveRight Unit:=wdWord, Count:=1, Extend:=False Selection.Find.ClearFormatting Selection.Find.Replacement.ClearFormatting With Selection.Find .Text = "[0-9]@, [0-9]@" .Replacement.Text = " " .Forward = True .Wrap = wdFindStop .Format = False .MatchCase = False .MatchWholeWord = False .MatchWildcards = True .MatchSoundsLike = False .MatchAllWordForms = False End With Selection.Find.Execute If (Selection.Find.Found = False) Then GoTo SubEnd Selection.MoveLeft Unit:=wdCharacter, Count:=1 Selection.MoveRight Unit:=wdWord, Count:=1, Extend:=wdExtend N1 = Selection + 1 Selection.MoveRight Unit:=wdCharacter, Count:=1 Selection.MoveRight Unit:=wdWord, Count:=1, Extend:=wdExtend Selection.MoveRight Unit:=wdCharacter, Count:=1 Selection.MoveRight Unit:=wdWord, Count:=1, Extend:=wdExtend N2 = Selection + 1 Selection.MoveLeft Unit:=wdCharacter, Count:=1 If (N2 = N1 + 1) Then Selection.MoveLeft Unit:=wdWord, Count:=1, Extend:=wdExtend Selection.TypeText Text:="-" Else: Selection.MoveRight Unit:=wdWord, Count:=1 End If Loop SubEnd:
'
'=====================================
|
. Help Marking up References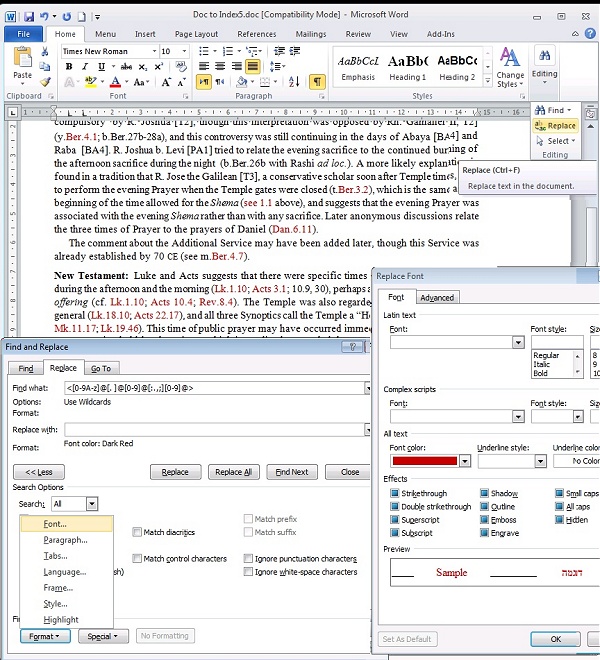
We can't use SimpleConcordanceProgram to mark up the references, because it will separate out all the numbers, so we need to make this Concordance file by other means.
First, make a new copy of your book, just for refs.
(This is because we will delete all text except the refs, in order to make a Concordance file of refs). The best way delete everything else is to all the references in a different colour, then delete all the non-coloured text, and create a concordance file from what is left ie: Do a Find+Replace looking for things looking like references, and mark them green. Here's how: * click on Edit: Replace or ribbon "Home", "Editing", "Replace" * click on "More" and tick "Use wildcards" * at "Find what" type: <[0-9A-z]@[. ]@[0-9]@[:.,;][0-9]@> * put the cursor in "Replace with" but leave it blank. * while the cursor is in "Replace with", click on Format: Font: Font color, and pick a colour (eg Red), then click OK * click on Find Next, and if it finds a reference, click "Replace" * if you are confident it is finding only references, click on Replace All.
As you can see in the screenshot, some non-standard refs
aren't turned red (eg "b.Ber.27b-28a") so you may have to do some extra
searches. To do this you may need to understand the searches a bit better.
The various symbols mean:
> an end of a word (ie followed by a space or punctuation) [0-9] any number [0-9A-Za-z.] any number or any letter from A-Z and a-z, or a period (.) @ one or more of the letters already defined [:.,;] any punctuation which might be used in a referenceIf your refs have a space between the number and the abbreviation add a space it to the formular ie to find "2 Cor. 1.1" use <[0-9] [A-z]@[. ]@[0-9]@[:.,;][0-9]@> If your refs follow on with other numbers, use other finds to colour them, ie to find ", 10" use: , [0-9]@> or to find "; 1:10" use: ; [0-9]@[:.,;][0-9]@ Play around with these and figure out more combinations till all your refs are coloured. |
. Making the Reference Concordance data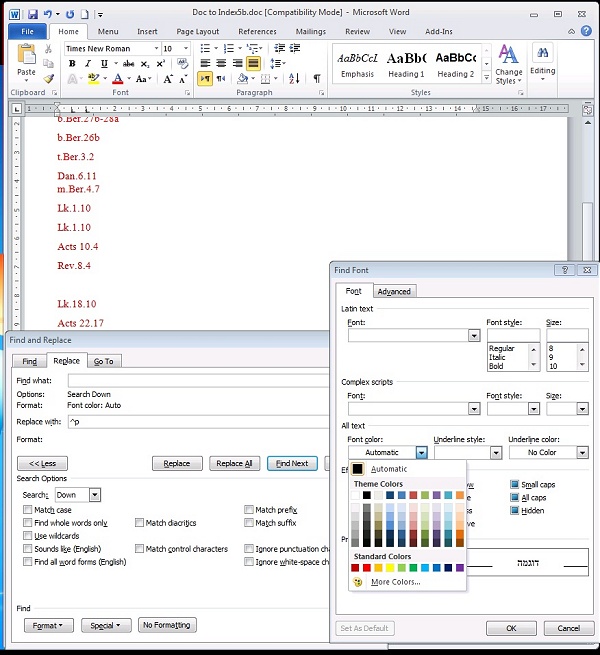
When you have a file with all the refs marked in red, use Find+Replace to delete everything except your coloured refs: * click on Edit: Replace and untick "Use wildcards" * in the "Find what" box remove everything and while the cursor is there, click on Format: Font: Font colour, and pick "Automatic" (or "Black") * in the "Replace with" box type: ^p and while the cursor is there, click on "No Formatting" * click "Replace All" and all the black text will be replaced with paragraph markers. * remove the excess paragraph markers by Find+Replace: Find= ^p^p Replace= ^p * tidy up other debris with other Find + Replace commands. |
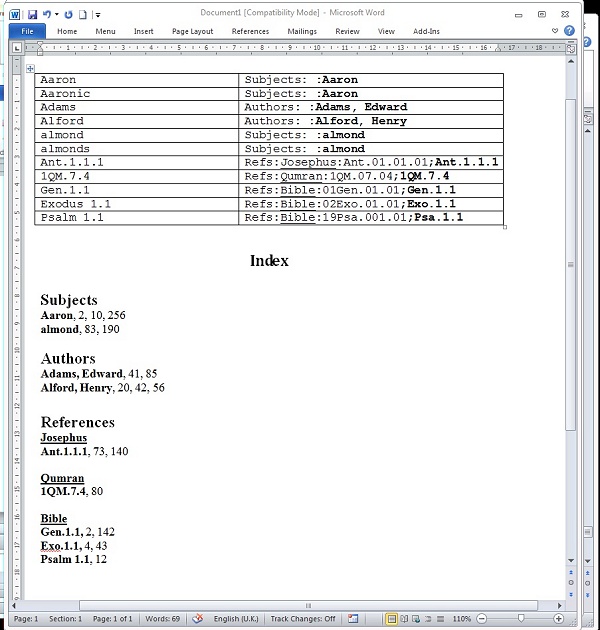
. Create a Reference Concordance table for referencesYou need to make a table in which the left-hand column has the references as they occur in your text, and the right-hand column has what you want in the index. Some complex refs may need more than one entry in the index.
To create the table:
* highlight the list (use Ctrl-A), then click on "Insert",
"Table", "Convert: Text to Table", and create a single-column table
* highlight the whole column, then copy and paste to create an identical second column (as when making a Concordance file before)
* make duplicate lines for multiple verses and tidy up the
right side, but leave the left along, eg:
1Cor.1.1 1Cor.1.1 1Cor.1.2, 5, 7 1Cor.1.2 1Cor.1.2, 5, 7 1Cor.1.5 1Cor.1.2, 5, 7 1Cor.1.7 1Cor.1.2-15; 3.4; 15.1,5 1Cor.1.2-15 1Cor.1.2-15; 3.4; 15.1,5 1Cor.3.4 1Cor.1.2-15; 3.4; 15.1,5 1Cor.15.1 1Cor.1.2-15; 3.4; 15.1,5 1Cor.15.5 Add the level structure for the index (as explained above), eg: 1Cor.1.1 References:Bible:461Cor.01.01;1 Cor. 1.1 |
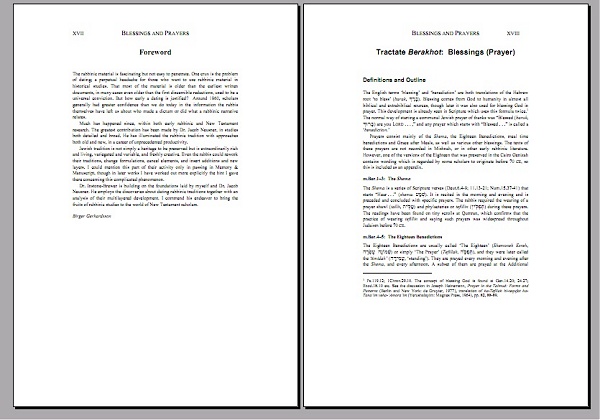
. More about IndexesSee the wonderful notes here and hereSpecial formatting issues for some publishers (by Diane Hakalah)
Today, many publishers, such as Mohr Siebeck, require the
author to submit a fully typeset version of their book in pdf format. This
means using a word processor to format the book and then creating a pdf
version. Some of the following pointers may help.
Styles - You will
need to use Styles, not only for headings and chapter titles, but also for
paragraphs. You can go on the internet and take a course, but here are a
few basics to get you started.
In Windows 7 and Vista, Styles is under Home. Click on the
arrow on the lower right corner of the box.
You will be given a list of Styles. If you have done
nothing, youll be on normal. If you click on Heading 1, the text where you
are located will automatically be formatted to Heading 1. To return, just
go back to Normal. If you want to change the formatting for Heading 1,
right click on Heading 1, then click on Modify. A few options appear on
the page for fonts, and all options are under the Format button in the
lower left corner.
Document Map an advantage of Styles If you have a long document like your thesis, you can save some time by setting all your chapter titles to Heading 1 and any sections to Heading 2. Now go to View and in the section called Show/Hide click on Document Map. Wait a few seconds and a table of contents will appear with all your Headings to the left of your document. Click on any heading there and it will automatically take you to that page.
Table of Contents
Word 2007 permits you to make an automated Table of Contents
from all your Headings Styles. You may have to manipulate the output to
meet many publishers specs.
How to Put Different Headings on the Left and Right
Page
If, like Mohr Siebeck, your publisher requires Chapter
Titles on the left page and Section Headings on the right page, there is
an easy way to do this.
Edit Header
In Word 2007, go to the Header, either by dbl clicking on
it, or by going to Insert, click menu Header, click Edit Header.
You will have a new group of sections.
Under Options, make sure all three boxes are checked
including, Different First Page and Different Odd & Even Pages.
Under Header & Footer click on the Page # menu and set
the preferred page style.
Under Positions, set the spacing for the publishers
preference.
Chapter Titles Use a Style
for the Chapter Title (such as Header 1)
Before Chapter Title, set an Odd Numbered Page Break by
going to Page Layout. In the Page Setup section, click on Breaks menu.
Click on Odd Page. This will insert an Odd Page break just before your
chapter title.
Now go to the first Even page after the beginning of
the chapter, i.e. the next page. For most publishers, chapters start on
the Odd page.
Go to the Even page Header (see two methods above).
Important! Next in the Navigation section, unclick Link
to Previous on the first even page. On the first chapter this wont matter,
but in subsequent chapters, if you change the Heading for the subsequent
chapter, it will automatically change the previous chapter headings as
well. You dont want that.
Now finally the magic. Use StyleRef in Word 2007. (Also available in Word 2003 and later).
Still editing the Header, in the section called Insert,
click on the menu called Quick Parts.
Click on Field. On the left there is a menu of Field Names.
Find StyleRef and click.
In the middle there will be a menu of Field Properties.
Click on whatever you have chosen as the Style for your Chapter Title
(such as Heading 1).
Section Headings on Odd Pages
Repeat the above for Chapter Titles. When you get to the
Field Properties of StyleRef, click on the Style that you have identified
for the Section Heading (eg. Heading 2).
Warning. You might wonder, and most tech types will try
to convince you, that the easiest method is to set a Page Break (for
Chapter Titles) and Section Break for Section headings and then copy and
paste the Title or Heading into the Header.
Unfortunately, though ok for Chapter Titles, it wont work
for Section Headings.
Reason #1 - if you have footnotes on either side of the
Continuous Page Break on a single page, Word 2007 will automatically
generate a Next Page Break. There are work-arounds, but. StyleRef is much
quicker and easier.
The other and more critical problem is that the Footnote
Numbering is also based on page breaks. That means that if you want to
restart footnotes at each chapter, and avoid footnote #2050 in your you
wont be able to use Continuous Page Break, because it will restart not
only your heading, but your footnotes. StyleRef avoids the problem.
Footnotes & Endnote Settings and
Numbering
Click on References.
In the section called Footnotes, click on the button in the
lower right corner. That will bring up a menu of options and most are
self-explanatory. To restart footnotes, click on the Numbering menu and
choose where to start.
Footnote Separator
Youre at the end of your thesis, and have put together
several chapters from 3+ years of work. The line which separates your
footnotes from the main body seems to have extra spaces or be of different
lengths, especially if youve changed computers or updated a word
processor. This line is called the Footnote Separator. How do you fix it?
In Word 2007, click on View and under Document Views, click
on Draft.
Then, back on the main toolbar, click on References. In the
Footnote section click on Show Notes.
The page will show a split window, and the lower window will
have a menu called All Footnotes. Click on the drop down menu, and click
on Footnote Separator. You will be able to edit this line in any way that
you desire. When youre done, go back to the main toolbar and click on
View, then Print Layout.
If there are extra spaces, before leaving Draft, go to Home
and click on the large backwards P in Paragraph. If there is more than one
P around the footnotes separator, you have extra spaces. Just delete.
Remove Page Number from First Page
If you do not want a page number on the first page, as with
most publishers and theses, go to your header. Either dbl click on the
header, or click on Insert, then in the Header & Footer section, click
on the Header drop menu and click on Edit Header.
In the Options section, check the box marked Different First
Page.
Hyphenation
Click on Page Layout.
Click on menu for Hyphenation and choose options.
Create Multiple Indexes
(This is the 'proper' way - not the easy fudge which is
outlined above)
It is possible to create multiple indexes. An index is in
fact an INDEX field, which collects information from XE fields in the
document; each XE field defines a separate index entry. And you can mark
for several different types of indexes by adding the \f
switch to your index entries. To display XE fields, show hidden text. For your authors, you'll see something like { XE "Author name here" }. Just add the \f "a" switch to the end of the code: { XE "Author name here" \f "a" }. Repeat this procedure for each type of index entry, adding an \f switch and a "category letter". For subjects, you could use \f "s". Then insert an index: Press Ctrl+F9. Word inserts field delimiters, { }. Type INDEX \f "a", and press F9 to update. For the next type of index, repeat the procedure, using the \f switch followed by the corresponding letter.
However, it is possible to create multiple indexes. An index
is in fact an INDEX field, which collects information from XE fields in
the document; each XE field defines a separate index entry. And you can
mark for several different types of indexes by adding the \f switch to
your index entries.
If you have already created your index entries without using
the \f switch. If you want to later add the \f switch to the XE fields in
the section, you can do it by following these steps:
Click Replace All. When you're asked if you want to search
the rest of the document, answer negatively. (You don't want to search the
entire document; you only want to affect the portion you selected in step
3.
|



4 comments:
Very good and complete guidance. There is an SCP version for the Mac now too! Thank you.
Thank you so much, you just saved me h o u r s of work! I've been using SPC and couldn't do without it, but I did not know about the AutoMark function of Word. Brilliant!!!!!!!!!!
This needs more recognition! SUPERB! Complete instructions! Detailed! Nothing can go wrong here!
THANK YOU!
Excellent! Very helpful, even for a Mac user. Thanks!
Post a Comment